
Oracle > Oracle Purchasing


Save and Submit for Approval

Check the requisition status


Query for the Requisition

Click on Automatic as shown in the above figure to create a Purchase Order

Click on “Create” button to create a Purchase order


Click the “Receiving Controls” to make sure that the “Routing” is made as “Direct Routing”

Click Save and submit for Approval.

Now PO is approved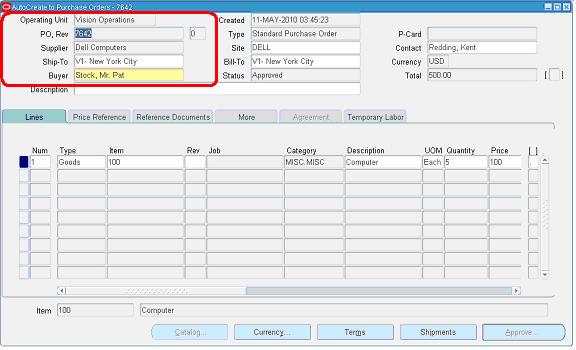


Check the check box near to the lines that are received and click save.


Go to any Inventory Responsibility and follow the below Navigation


Click “Actions” Button then tick the “Validate Check Box” and press “Ok” to validate the invoice


6:
Make the payment against the invoice
Below is the payment window.

7:
Oracle Procure to Pay (P2P ) Cycle - Oracle Purchasing
Procure
to Pay Lifecycle is one of the important Process in Oracle Applications.
Procure to Pay means Procuring Raw Materials required to manufacture the final or
finished Goods from a Supplier to Paying the Supplier from whom the material was purchased.

Following is the steps for P2P Cycle :
1- Purchase Requisition
(PR) Creation - Purchasing Module
2- Tendering
(RFQ-Quotations) - Purchasing Module( Sourcing )
3- Purchase Order (PO)
Creation-Purchasing
Module( Sourcing )
4- Receipts (Inspection
- Receiving) - Inventory Module
5- Invoice Creation - Payable Module
6- Payments to suppliers
- Payable
Module
7- Bank reconciliations
- Cash
Management Module
1: Creation of Requisition
Create the Purchase requisition from below navigation
Enter the required details to complete PR.
Enter the Charge Account.
Save and Submit for Approval
Query for the Requisition Number and click Find.
Status
To see the approval status, please follow the below navigation.
2: Tendering Process (RFQ - Quotation)
2.1- Request for Quotation (RFQ)
Create Request for Quotation (RFQ)


2.2- Quotation creation
Create the Quotation in the system to generate the PO. ( You can use the Sourcing for Quote analysis and awarding the Quote)

3 -Purchase Order (PO) Creation
Create PO from “Autocreate Documents” Form.
Follow the below Navigation
Follow the below Navigation
Click on Automatic as shown in the above figure to create a Purchase Order

Click on “Create” button to create a Purchase order
View the shipment screen to change the “Match Approval Level” to “2-Way”.
Click Save and submit for Approval.
Now PO is approved
4: Creation of Receipts
Navigation to for receipt
Query with the Purchase order created in the above stage.
Click the “Header Button” to view the Receipt Number.
Onhand verification
Query for our Receipt and make sure the Organization is the same as we received.
Below screen will show that our inventory has been increased by 5 quantities.
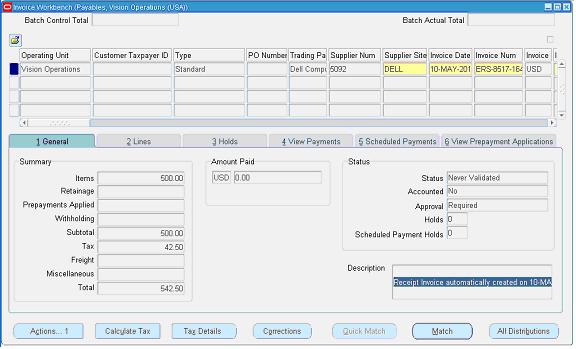
5: Creation of Invoice
Navigate to any Purchasing Responsibility and view à Requests
Submit the below requests by providing the Receipt number as Parameter to create an invoice.
Check the status of the program.
In Payables module / You can optionally create manual invoice and then matched with PO.
Change to any Payables Responsibility and open the invoices Form.
Query for the Purchase order as below,
Below screenshot will give you the status of the invoice
6:
Make the payment against the invoice
Below is the payment window.

7:
Reconcile the bank in Cash Management module against that payment then create accounting and transfer the Journal entries into General Ledger (GL).
******************************
No comments:
Post a Comment