Oracle Order Management & Account Receivables:
Order to Cash Cycle O2C :

Order to Cash (O2C) process
starts with entering the order with standard item into system.
When you enter the order,
the item is validated in oracle inventory, the availability of the item are
checked may be reserved and pricing by advance price.
Enter the Sales Order –
Items are validated in Inventory, availability and price check by
price engine.
Book the Sales Order –
Header and line level entry then book the order and order booked
and status will be changed to "Booked"
Launch Pick Release –
In next steps Items are moved from Warehouse to staging area.
Ship Confirm–
Next step it indicates that the items are loaded on the carriers
from the staging area. When run ship confirm the system decrease inventory and updates
sales order line status.
Create Invoice–
After ship confirmation invoice is created through auto-invoice
(this is the integration point b/w AR and OM)
Receipts & Match with Invoice –
Against the receivables receipts enter in the Oracle receivables
system and then these receipts matched with the invoices.
Bank Reconciliations –
In Cash management bank reconciliation is performed for receipts.
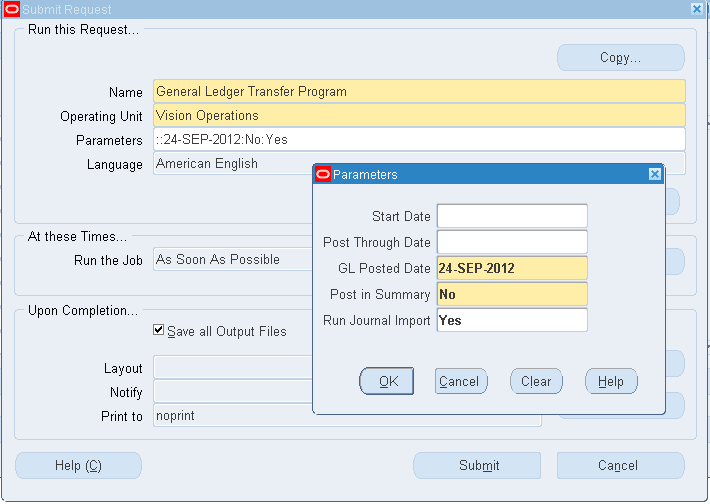
Create Accounting & GL Transfer–
Create accounting is run
after month end and all the transactions are transferred to GL.
GL Posting –
Once transactions are transferred to GL, then it is posted in GL
and after posting it will be reflected in the Trail balance.
Involved Modules
Order Management: Creating and shipping the Order
Inventory: On-hand availability, Reservation
Receivables: Invoices & Receipt against invoice
General Ledger: Importing, entering and posting the journals.
Steps By Step guide for Order to Cash Cycle (O2C)
Enter the Sales Order:
Order Management >Orders Returns >Sales Orders
Enter the Customer details (Ship to and Bill to address), Order type.

Click on Lines Tab. Enter the Item to be ordered and the quantity required.

Line is scheduled automatically when the Line Item is saved.
Scheduling/unscheduling can be done manually by selecting Schedule/Un schedule from the Actions Menu.

Book the Sales Order:
Book the Order by clicking on the Book Order button

Now that the Order is BOOKED, the status on the header is change accordingly.
Launch Pick Release:
Shipping > Release Sales Order > Release Sales Orders
Give the Sales Order and Rule details as required

Key in the details in Shipping Tab, Autocreate Delivery: Yes, Auto Pick Confirm: Yes, Autopack Delivery: Yes

Similarly key in the Subinventory, location and org details in Inventory tab as required

On completion this will show below window

Pick Release process will in turn run few more concurrent requests
like Auto Pack Report, Pick Slip Report, Shipping Exceptions Report (These are
what we have chosen in the shipping tab during Pick Release)

Pick Confirm the Order:
If Auto Pick Confirm is set to Yes during Pick Release, then this process will happen systematically.
In other cases, need to do this by doing a move order transaction
Inventory Super User > Move Order> Transact Move Order
Take the Move Order Number form the Shipping Transaction Form and find that and transact.
Ship Confirm the Order:
Order Management Super User>Shipping >Transactions
Find by Order Number

Here you can find all the details
If the line status is Staged/Pick Confirmed, we can go for a shipment.
Then Click on the Delivery tab

Then Click Ship Confirm
Note: If Ship Confirm button is inactive, then please check to the user id you are logged in, whether Shipping Grant given or not. If not they add a shipping grant to the user id and try again.
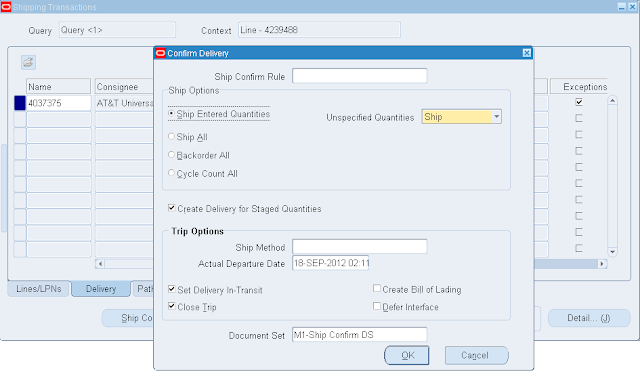
Then OK.
The Status in Shipping Transaction form in Delivery tab should be closed

This will kick off concurrent programs like.INTERFACE TRIP Stop, Commercial Invoice, Packing Slip Report, Bill of Lading
Once all background process completes, the Shipping Transaction Status in Lines/LPNs tab becomes Interfaced

Create Invoice:
Run workflow background Process
Order Management >view >Requests


And spawns Auto invoice Master Program and Auto invoice import program which creates Invoice for that particular Order

Check the Invoice:
The Invoice created can be seen using the Receivables responsibility
Receivables Super User> Transactions> Transactions
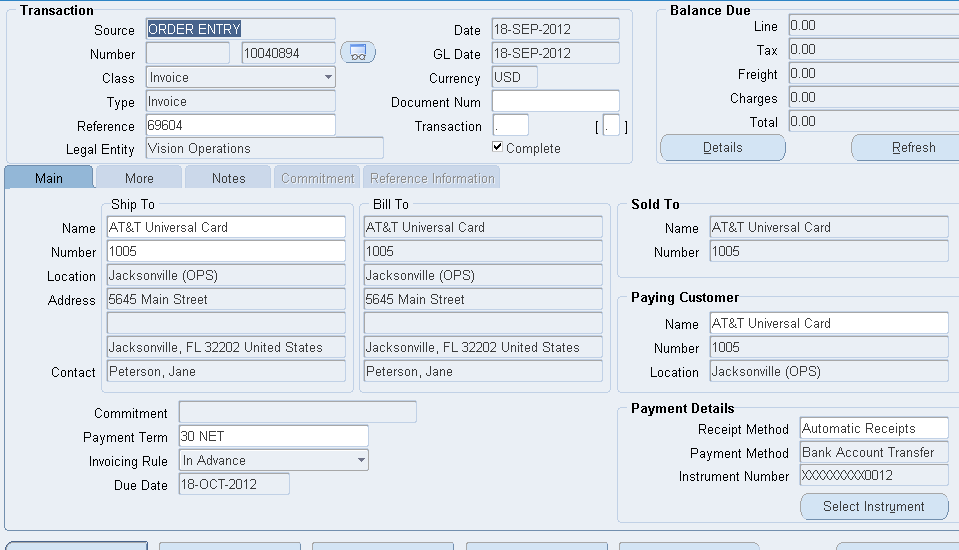
Create receipt: Receivables> Receipts> Receipts