Sunday, November 27, 2016

Oracle Inventory Physical Count

Physical Inventory count Oracle Inventory

→⍟⍟⍟⍟⍟⍟⍟⍟⍟⍟⍟⍟⍟⍟⍟ ⍣

Oracle Inventory provides a fully automated physical inventory feature that you can use to reconcile system-maintained item on-hand balances with actual counts of inventory. Accurate system on-hand quantities are essential for managing supply and demand, maintaining high service levels, and planning production

Steps to perform Physical Count 


1- Define a physical inventory:

2- Take a snapshot of system on-hand quantities. 

3- Generate alphanumeric tags. 

4- Void unused or lost tags. 

5- Approve or reject physical inventory adjustments 

6- Purge physical inventory information. 

Performing Physical Inventory:

Navigation:Inventory > Counting > Physical Counting


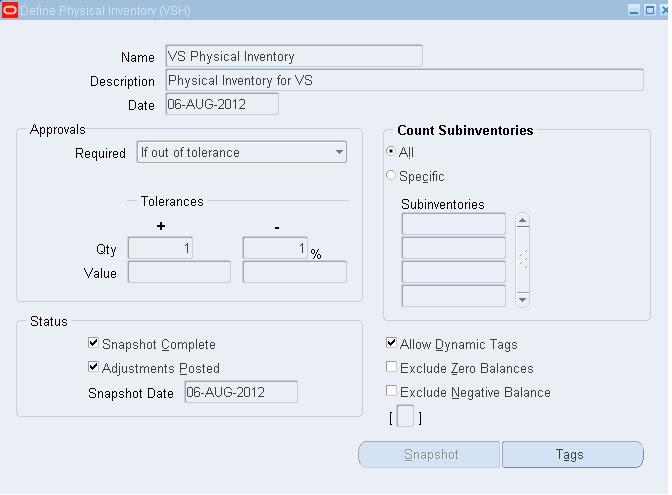
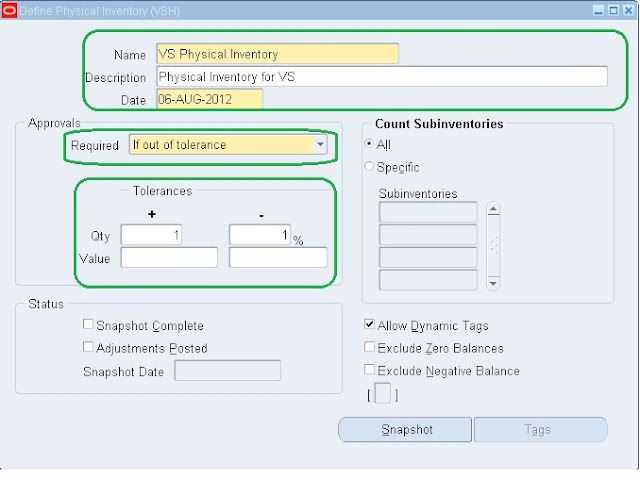
Enter Name
Description
Approvals
Tolerances 

then click on Snapshot.


Enter Starting Tag
And Digit increments

Then Click on Generate Button


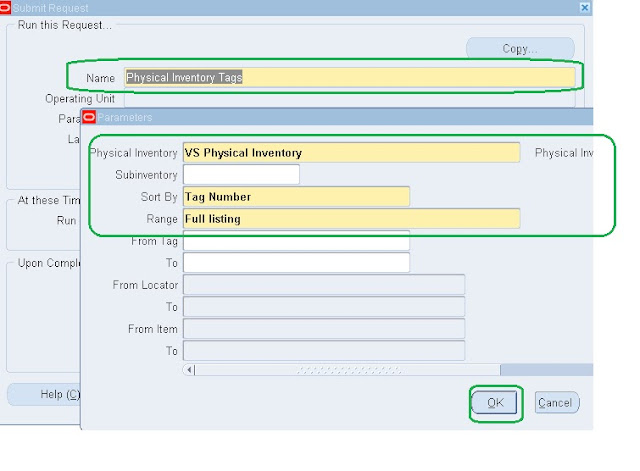
Run the above report to generate tags.

Fill the parameters.

Press Ok to run the report.

Then click on Output.


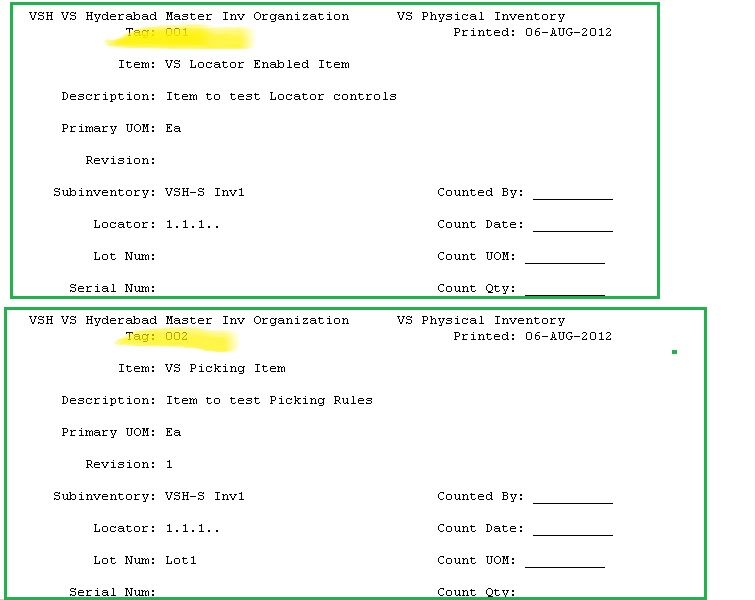
Tags will be generated as per the screen shot.

Take the tags prints and count the inventory.

Enter the counted quantity of the items.

Then update the record with the count quantity.


Navigate to the Tag Count window.

Physical Inventory > Tag Counts


Enter the counted quantity in the Qty Field.


Enter quantities in the as manually counted.

Save the record.


Navigation :Physical Counts > Approve Adjustments

Click Approve All to Approve the adjustments.


Then Launch the adjustments.

Navigation: Tools > Launch Adjusments


Adjustment will be posted automatically.


⍾⍾⍾⍾⍾⍾⍾⍾⍾⍾⍾⍾⍾⍾⍾


What are the Oracle Open Interfaces

Oracle Open Interfaces

____________________________________________________


An Interface allows us to Import data from a variety of environments, including our system, previous system data collection devices, external systems, and others in the easiest way possible.
Review the results of import runs, including validation, review update, re imports, and error identification.
Export data from Oracle Applications products for use in other systems.

Interface Tables
Throughout Oracle Applications products, Oracle Developers have developed Interface tables and programs. Tables allows us to load data, and then to run an Application concurrent program. That concurrent program will take the data from the Interface Table, Validate it, and Import it into our Application Instance.

There are numerous Interface tables in the Oracle Applications products to help with the importation of data.
Application Programming Interfaces(APIs) : API's provide tighter integration to Oracle Applications than can be provided with Interface Tables.

Several Oracle Applications products allow for data upload and download via spreadsheets. The spreadsheet formats are predefined. The mechanics of the upload or download are quite simple.

Oracle Applications also support data uploads and downloads to Oracle Discoverer and word processing files.
Below are Oracle Interfaces.


1) -  Order Import Interface

2)  - Item Import (Item conversion)

3) -  On-hand Quantity

4)  - Customer Conversion

5)  - Customer API

6)  - Auto Invoice Interface

7) -  Receipt API

8)  - Auto Lockbox Interface

9)  - AP Invoice Interface

10) - Vendor Interface/Conversion

11) - Requisition Import

12) - PO receipts interface

13) - GL Interface

14)  -GL Budget Interface

15) - GL Daily conversion rates


〿〿〿〿〿〿〿〿〿〿〿〿〿〿〿〿〿〿〿〿〿〿〿


What is concept of Shared Entities - Oracle

______________________________________

Concept of Shared Entities in Oracle

_____________________________________


The financial application suite of products shares a common data model and a set of integrated applications to give the enterprise a holistic view of their data. This enables the enterprise to view their business/financial information in a consolidated view and assist in their making informed decisions.

Shared entities allow one-time definition of a business object so that it can be used across various modules. The ownership of a shared entity within a business organization may vary but technically the ownership is linked to the single module.
Here is list some often used shared entities with corresponding product owners


Shared Entity                               Owner of shared entity
_____________________________________________
Unit of Measure         >                      Inventory
Items                             >                   Inventory
Suppliers                         >                 Purchasing
Customers                         >               Receivables
Salespersons                       >             Sales
Employees                           >             Human Resources
Locations                               >           Human Resources
Currencies                                >        Application Object Library


    *************************************

Oracle Cash Management Setups - Defining Bank Transaction Codes in CM

Oracle Cash Management Setups - Defining Bank Transaction Codes in CM

________________________________________

We must define bank transaction codes in Oracle Cash Management if we wish to use Oracle's electronic bank statements with the Auto Reconciliation features. The codes used by our bank identify the different types of transactions on our bank statement. We must define a bank transaction codes for each code you expect to receive from our bank. We may define different codes for different banks.


Cash Management defines the following possible types:


Payment: 

Payments such as generated or recorded checks, payment batches, wire transfers, electronic funds transfers, or payroll checks.

Receipt:

 Receipts such as received checks, remittance batches, direct debits, and bills of exchange.

Miscellaneous payment:

 Payments not associated with supplier invoices, such as petty cash transactions directly posted to cost accounts, or bank charges.

Miscellaneous receipt:

 Receipts not associated with customer invoices, such as petty cash transactions directly posted to revenue accounts, such as interest received.

Stopped:

 Stopped payments previously entered, generated, or cleared, such as callback of check. A stopped transaction type matches only to Voided or Stopped payments in Payables or Oracle Payroll.

Rejected:

 Receipts rejected for reasons other than non-sufficient funds, such as an invalid bank account. A rejected transaction type matches only to reversed receipts in Receivables.

NSF (Non-Sufficient Funds):

Receipts rejected by the bank because the accounts on which they were drawn had non-sufficient funds. You can reverse these receipts by creating a standard reversal. Cash Management reopens the invoices you closed with the original receipt. When you match bank statement lines with transactions, an NSF transaction type only matches to reversed receipts in Receivables.

Sweep In.

 Incoming funds transfer from an internal bank account. This bank transaction type identifies the originating bank account.

Sweep Out.

 Outgoing funds transfer from an internal bank account. This bank transaction type identifies the receiving bank account.

Navigation : ______________________________________


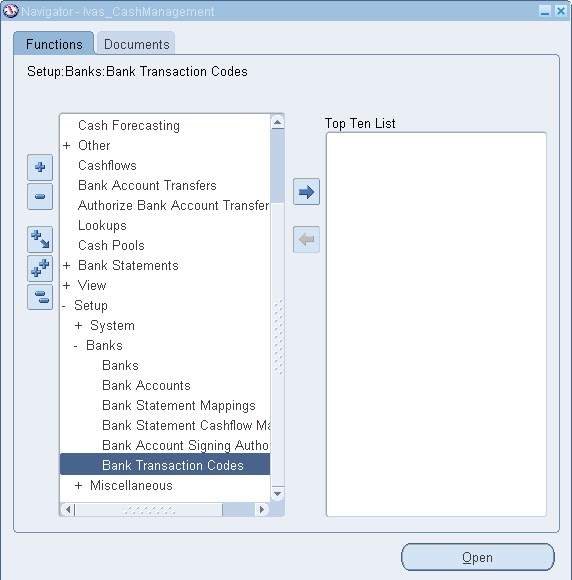
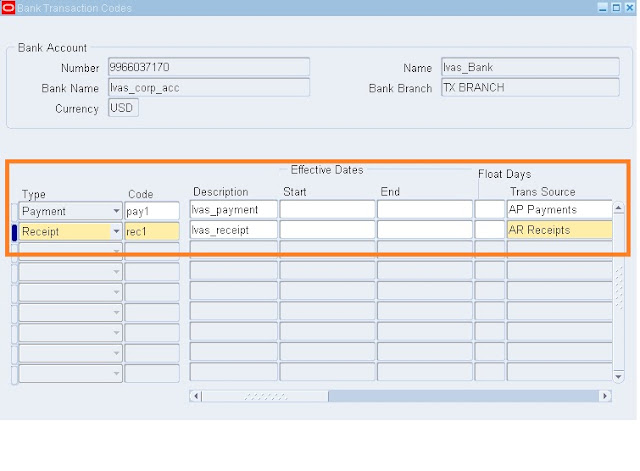
1. Navigate to the Bank Transaction Codes window.

2. Select the bank, whose codes you are defining, from the Find Bank window. 
Alternatively, you can query the bank Account Number. The system displays the Bank Transaction Codes window, which includes Bank Account and Bank information, as well as a region for entering transaction codes.

3. For each transaction code you are defining, select a transaction Type from the poplist. The transaction type determines how Cash Management will match and account for transactions with that code.

4. Enter the Code used by your bank.

5. Enter an optional description of the transaction.

6. Enter Start and End Dates to determine when the bank transaction code is considered active.

7. Enter the number of Float Days that you want Cash Management to add to or subtract from the statement date to create an anticipated value date for automatic lockbox receipts.

8. Enter a Transaction Source for payment and receipt transactions. Choose Journal from the list of values to reconcile statement lines with the assigned transaction code to General Ledger journals. 

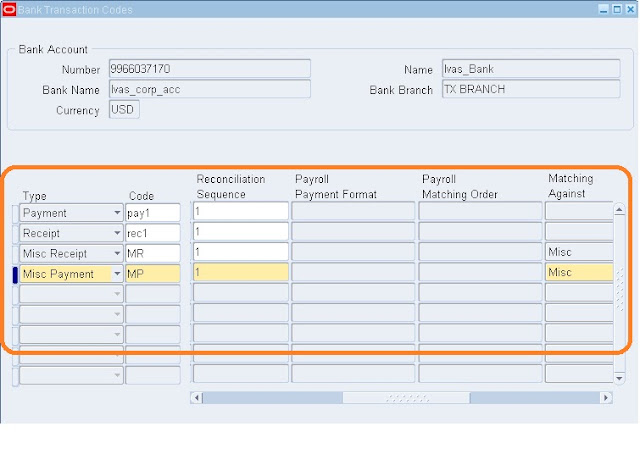
9. Optionally select a value for the Payroll Payment Format field to reconcile statement lines with the assigned transaction code to Payroll EFT payments. T

10. If the transaction Type is Miscellaneous Receipt or Miscellaneous Payment, enter the Matching Against field to determine the order of matching and the type of transactions to match.

§  Misc: Only match against miscellaneous transactions.
§  Stmt: Identify the statement line as a correcting entry. The statement line will match against existing statement lines. The netted amount of these lines is used to match to subledger transactions.
§  Misc, Stmt: First try to match against miscellaneous transactions, if there is no match, then try to match against statement lines (corrections).
§  Stmt, Misc: First try to match against statement lines (corrections), if there is no match, then try to match against miscellaneous transactions.

11. Choose the Correction Method your bank uses when correcting bank errors: Reversal, Adjustment, or Both.
This field is only applicable for those Miscellaneous Receipt or Miscellaneous Payment transaction codes that may be used to match to correction statement lines.

12. Choose whether to Create transactions for any Miscellaneous Payments and Miscellaneous Receipts reported on the bank statement when no transaction number is provided.

13. If you chose the Create option in the previous field, specify the Receivables Activity type and Payment Method for any miscellaneous transactions (receipts or payments) you create from within Cash Management.

14. Define each additional bank transaction code, following the previous steps.

15. Save your work.

Tuesday, November 22, 2016

Oracle Cash Management Setups - System Parameters

Oracle Cash Management Setups - System Parameters

________________________________________
Oracle Cash Management configuration:

Pre-Requisites:


Complete the below required setups to start CM setups:

  • Create Cash Management Responsibility
  • Define Profile Option Values for Cash Management responsibility
  • Assign Cash Management Responsibility to Users
  •  Assign Legal Entity to the Cash Management Responsibility


Assigning the Legal Entity to Cash Management responsibility gives the access to legal entity for cash management setups.

Note: This is very important setup and without this setup, you cannot access the legal entity to setup CM system parameters. 

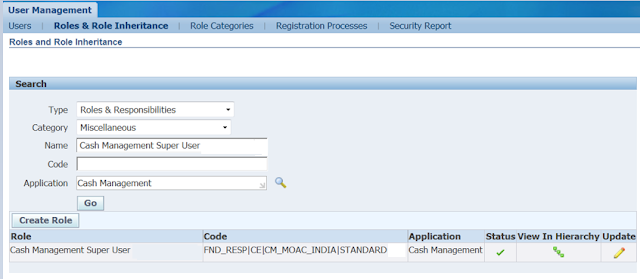
Responsibility: User Management > Roles & Role Inheritance


Select Type: Roles & Responsibilities
Select Category: Miscellaneous
Select Name: Cash Management Super User (Responsibility Name) 
Select Application: Cash Management
Press Go button
Then Click on Update.

Below screen will appear.


Click on Security Wizards button


Click on Run Wizard


Click on Add Legal Entities button to add legal entity
Select Legal Entity
Checked box Use field
Checked Box Bank Account Grants Maintenance Field
Checked Box Bank Account Transfers


****** Pre- requisite section ended ***************************

Cash Management Setups:

Setups the CM setups to configure Cash Management Module
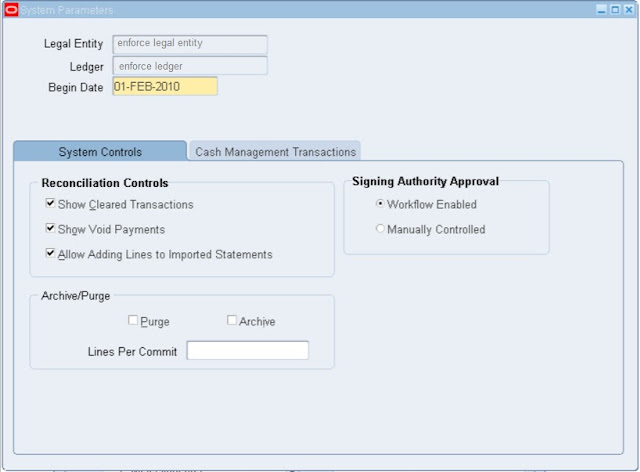
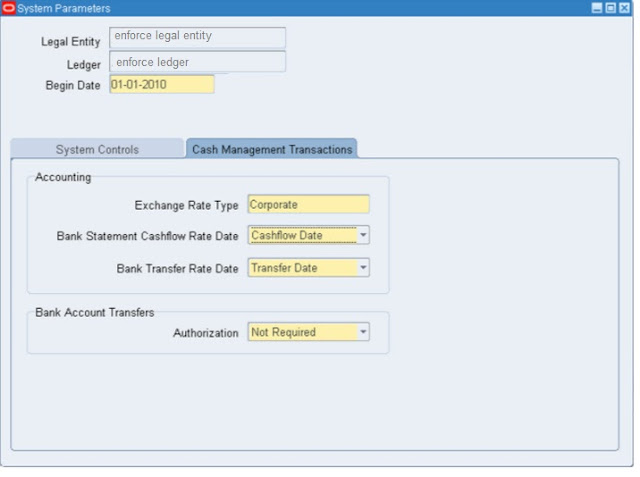
Navigation: Cash Management > Setup > System > System Parameters


Select Legal Entity
Select Ledger
Enter Begin Date

System Controls:


Show Cleared Transactions:

 If you check this check box, cleared transactions will be available for reconciliation along with uncleared transactions. Otherwise only unclear transactions will appear for reconciliation.

Show Void Payments:

You need to select this option if you want to voided payments available for reconciliations.

Add Lines to Automatic Statements:


 If you check this check box, users can add lines to existing automatically loaded bank statements.

Archive/Purge:


Use the Archive and Purge check boxes to allow Auto-reconciliation program to automatically purge/archive the data from Bank Statement Interface tables once the information has been successfully transferred to the bank statement tables.
Note: You need to run the purge/archive Bank Statement Program.

Line Per Limit:

This is the number of lines that auto reconciliation will save at the given time.

Signatory Authorization limit:

You can select signatory approval limit manual or workflow enabled.

Workflow enabled:

This option use the seeded business even to change the status on the bank account signatory authority window from pending to approved, when record is entered.

Manually Controlled:

These options allow configuring the workflow approval process.


Cash Management Transaction:


Exchange Rate Type:

 Cash Flows and Bank Account Transfer transactions use the exchange rate specified here.

Bank Statement Cash flow Rate Date: 


The cash flow program uses the date specified here to get the exchange rate details.

Bank Transfer Rate Date: 


The Bank Account Transfers use the date specified here to get the exchange rate details.

Bank Account Transfers Authorization: 

Specify whether the authorization is required to settle bank account transfers.


Sunday, November 20, 2016

Oracle General Ledger > Recurring Journals (GL)

How to create Recurring Journals in Oracle Journal Ledger (GL)


Oracle General Ledger > Recurring Journals (GL)

A recurring journal entry is a journal entry that is recorded in every accounting period. For example, a company issuing monthly financial statements might record depreciation by debiting Depreciation Expense for $3,000 and crediting Accumulated Depreciation for $3,000 each and every month.

Types of Recurring Journals:

  1.   Skeleton Journal:
  2.   Standard Recurring Journal
  3. Recurring Journal Formula


Skeleton Journal Entries:


 Skeleton entries affect the same accounts each period, but have different posting amounts. After you generate skeleton journal entries, you can edit the unposted journal batch using the Enter Journals form and enter the journal line amounts.
Skeleton journal entries are useful with statistical information whenever you want to record journals for actual transactions based on statistical amounts, such as headcount, units sold, inflation rates, or other growth factors. For example, if you want to enter headcount for each cost center every period, you can define a skeleton entry with your headcount accounts. After you generate the skeleton entries, enter the actual headcount amounts before posting the batch.

Standard Recurring Journal Entries:

Standard recurring journal entries use the same accounts and amounts each period.

Recurring Journal Formula Entries:

 Formula entries use formulas to calculate journal amounts that vary from period to period.


Creating Recurring Journal Entries:


Navigation: GL> Journals >Define>Recurring


  • Navigate to the Define Recurring Journal Formula window.
  • Enter a Name and optional Description for the recurring journal batch.
  • If you want to copy entries from an existing recurring journal batch to your new batch, choose Auto Copy Batch.
  • Create recurring journal entries for the batch. If you copied entries, modify them, if necessary.
  • Save your work.
  • Generate recurring journals.
  • Review and post your generated recurring journal batches


To enter a recurring journal entry line:

1. Navigate to the Define Recurring Journal Formula window.
2. Enter or query the batch name and the journal entry name.
3. Choose Lines.
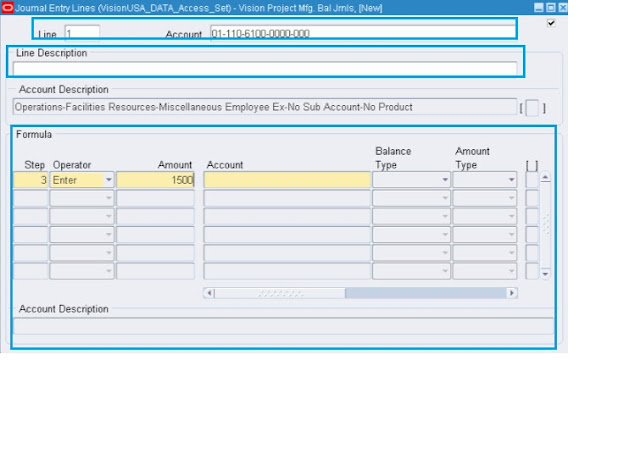
4. Enter a Line number to set the order of your recurring journal entry lines. You can indicate an automatic offsetting line for your recurring journal entry by entering the line number 9999.
5. Enter the Account you want General Ledger to update when you generate and post your recurring journals.
6. Enter an optional Line Description for the recurring entry line.
7. Enter a Formula for the line.
8. Enter the remaining lines for the recurring journal entry. Remember that you can use line number 9999 as the automatic offsetting line for each recurring journal entry.
9. Save your work.


Skeleton Journal, Standard and Formula Journals are creating with the same process. In Skeleton Journal enter the lines and in standard Journals enter lines and amount that will be the same each month and in Formula Journal line formulas are used in the lines and these formulas are based on the requirement of the Journals.