
Oracle Cash Management Setups - System Parameters
________________________________________
Oracle Cash Management configuration:
Pre-Requisites:
Complete the below required setups to start CM setups:
- Create Cash Management
Responsibility
- Define Profile Option Values for
Cash Management responsibility
- Assign Cash Management
Responsibility to Users
- Assign Legal Entity to the Cash
Management Responsibility
Assigning the Legal Entity to Cash Management
responsibility gives the access to legal entity for cash management setups.
Note: This is very important setup and without this
setup, you cannot access the legal entity to setup CM system parameters.
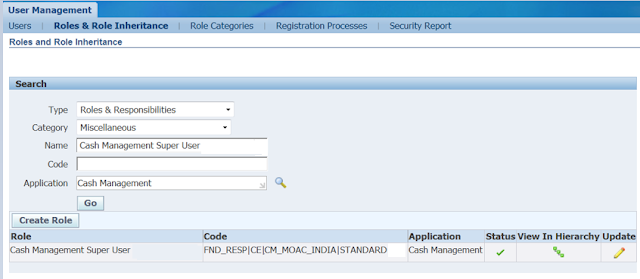
Select Type:
Roles & Responsibilities
Select Category:
Miscellaneous
Select Name: Cash
Management Super User (Responsibility Name)
Select Application:
Cash Management
Press Go
button
Then Click on Update.
Below screen will appear.

Click on Security Wizards button

Click on Run Wizard

Click on Add Legal Entities button to add legal
entity
Select Legal
Entity
Checked box Use field
Checked Box Bank
Account Grants Maintenance Field
Checked Box Bank Account Transfers
****** Pre- requisite section ended ***************************
Cash Management Setups:
Setups the CM setups to configure Cash
Management Module
Navigation: Cash Management > Setup > System > System Parameters
Navigation: Cash Management > Setup > System > System Parameters

Select Legal
Entity
Select
Ledger
Enter Begin
Date
System Controls:
Show Cleared Transactions:
If you check this check box, cleared
transactions will be available for reconciliation along with uncleared
transactions. Otherwise only unclear transactions will appear for
reconciliation.
Show Void Payments:
You need to select this option if you want to
voided payments available for reconciliations.
Add Lines to Automatic Statements:
If you check this check box, users can
add lines to existing automatically loaded bank statements.
Archive/Purge:
Use the Archive and Purge check boxes to allow
Auto-reconciliation program to automatically purge/archive the data from Bank
Statement Interface tables once the information has been successfully
transferred to the bank statement tables.
Note:
You need to run the purge/archive Bank Statement Program.
Line Per Limit:
This is the number of lines that auto reconciliation
will save at the given time.
Signatory Authorization limit:
You can select signatory approval limit manual
or workflow enabled.
Workflow enabled:
This option use the seeded business even to
change the status on the bank account signatory authority window from pending
to approved, when record is entered.
Manually Controlled:
These options allow configuring the workflow
approval process.
Cash Management Transaction:

Exchange Rate Type:
Cash Flows and Bank Account Transfer transactions use
the exchange rate specified here.
Bank Statement Cash flow Rate Date:
The cash flow program uses the date specified here to get the
exchange rate details.
Bank Transfer Rate Date:
The Bank Account Transfers use the date specified here to get
the exchange rate details.
Bank Account Transfers Authorization:
Specify whether the authorization is required to settle bank account
transfers.
No comments:
Post a Comment